
The A/W O collection is nearly complete so I turned my sewing attention to knocking off a few Issey Miyake Pleats Please pieces. This was driven, inspired and encouraged by Linda, Nicedressthanksimadeit. for her annual Designin’ December event.
“Why buy when you can make it yourself – better and for less money?”
We have all seen something we LOVE either in the stores, online or on the runways, but don’t actually want to buy for some reason. So I propose that we sew that garment that we see/want. Now if you are lucky and you already have an exact pattern, either an indie pattern, your own self-drafted, or a “Big 4” pattern, that you can use – then go for it! If you have to alter a pattern that you already have, or draft your own pattern, you can do that too. Whatever works for you. Let’s make what we see and want!
Here are my designer originals….

…..and here’s what I made

The olive green plisse poly was found on eBay for a song – 3m for a paltry £12. It looks much more shiny in the photos than in real life which is more like a sheen than a shine.
The black crinkle fabric for the duster coat is from Croftmill and I used the wrong side on the right side – bit classier in my opinion.
Trousers
Two patterns were involved – Vogue 1550, Paco Peralta for the leg width and length and Vogue 1508, Zandra Rhodes for the elasticated waistband.


I just laid both pattern pieces on top of one another and cut the shape I wanted – no drafting needed and no pattern was harmed in the making of these trousers.
The plisse poly is slightly stretchy and doesn’t fray – here’s me ‘hemming’ the trouser legs:

I made the trousers with a deep elasticated waistband and a few belt carriers added to hold the self fabric, non-edged, single layer tie belt. Simple.

Top
I used Drape Drape 2 asymmetrical top and, while this is not an exact copy of the Miyake original, it served my purpose admirably with its lopsided look and Japanese aesthetic.
After sewing up the one-piece piece of fabric, the front neckline was truly low! I may have made an error somewhere in the cutting or sewing – who knows? Easy fix though, I wear the top back to front. However, I did add another little pleat at the old centre front which is now the new centre back to draw the neckline up a bit. With me here?

The sleeve edges and neckline are turned over and sewn but the hem is not – it matches the trouser hemming technique.

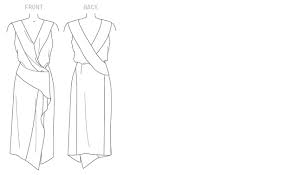
Coat
Using StyleArc’s Toni dress as a basis for the coat I lengthened the sleeves by simply cutting long along the pattern lines; the front seam is not sewn closed but turned in, sewn and left open, I added a single button closure; the side seams are sewn as far as the ‘drape’ to create side splits. There are no pockets.

I added some cuffs to the sleeve hems just because I had a little bit of fabric that suited the purpose.

Buttoned up and showing the height of the side splits.

Here’s an out-shot showing the actual right side of the fabric in the inside which I choose as the wrong side (bottom left) – everybody still following me here? I just thought the matt side was classier and a good contrast to the sheen of the plisse. You can also get an idea of the waft and drape of the coat.

The Designin’ December outfit was paired with Trippen boots, pearls, full make-up and blow-dried hair. I was actually going on a very posh night out – hence the extravagance – I don’t usually hang around the house looking like this! Actually I do………..no I don’t!

Many thanks to Linda for getting me involved and for those of you out there who are inspired by designer clothes, it’s not too late to join in.


Show us your Designer Original photo and how you put together your Designer me-made COPY.
Hopefully I’ve done that and in your opinion – did I get a designer outfit for around 34 quid instead of £ 1,500?


 hacked


