
Merchant and MIlls Workbook – Pattern 3 The Bantam Vest
Well, we can talk about these bantams:

Or these bantams:
 Or these ones:

Personally, I eat chickens and have a distaste of boxing so I guess we’re stuck on the last option, which is a good thing if you’re into sewing. If you are here to find out about breeding fowls or Carl Frampton you can backspace now! If you are here to know about Merchant and Mills Batam Vest Top you have come the right place. This is a long one: lots of pics and deviations – get a cup of tea or come back later when you have more time.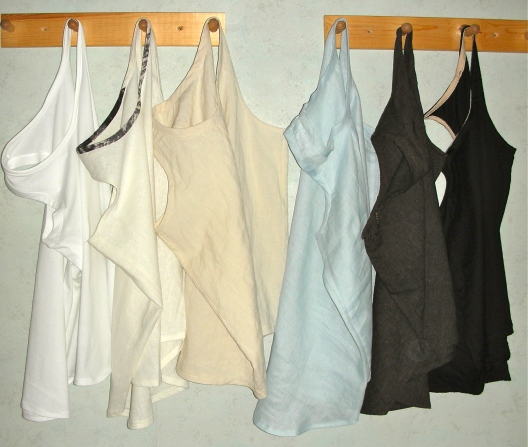
This is the first pattern in the Workbook but just happens to be the third one I’ve tried. Others have made this – Roobeedoo – with intimate details on the bias bindings: Su, Linda who also made the Bantam dress, Agnes from Blue Hedgehog who is doing the same as me and working her way through the Workbook.
You can see from my current collection that, once again, I am quite taken with this pattern – six, so far! A breeze to sew and uses about 1m of fabric (but I’ll come back to this yardage later) so a great stash buster. Once you get into the grove you can make this in one hour or so – much less than it actually takes to get in the car, find a parking space, go searching in a few shops, try on and buy a racer-back top that fits you and is the colour you want.

Make the most of your available fabric
Pattern description: this is a simple slightly A-line type vest top; sleeveless with a mild racer back; long length with curved hemlines and a dipped back. You sew the hems before you sew the side seams! Such a simple but breakthrough idea. The curved hems are so much easier to do on a single piece instead of a completed garment. I will be using this technique on all future shirt tail patterns.
M&M instructions are to sew French seams which is really no big deal for two side seams and two small shoulder ones. Some of my collection have overlocked (serged) seams instead – lazy girl!
The hardest bit is the binding – neck and armholes. Bias bands are required and this needs a relatively large amount of fabric and I’m not the best at edge stitching. Hopefully after six of these and all that practise, I’m a little bit better…..
Each of my versions has a slightly different binding: raw edges allowed to fray; hand-stitched on the inside; machine-stitched on the outside; folded over to cover raw edges; serged and topstitched; totally folded to the inside. You name it, I’ve done it!

White cotton jersey. Serged neckline, folded over and edge stitched. Armholes are serged and pressed open.

Leftover cream linen from the Heron Wrap top, Neckline is the border print.

Wool, cotton and metal fabric; creases naturally. Had to squeeze the pattern into the leftovers and covered the centre front seam with a strip. Shorter than the regular Bantams due to my fabric limitations.

The finest Irish shirt linen in pale blue that has been in my stash box for 15 years. So glad to have put it to good use after all this time. Has a couple of unexpected ‘pleats’ around the neckline – but hey, we’re not all perfect so it’s a design feature!

Brown/black striped linen rescued from a previously failed bias dress. Raw edges on the armholes which I hope will fray artistically.

Double layered black muslin. Using the cotton jersey as binding.
If you have 1m of leftover fabric stashed somewhere, some of mine was more than 15 yrs in waiting, this is a perfect alternative to Sorbetto (take note Twotoast!) but better. The problem is the bias binding because you’ll need loads more fabric to make this. The M&M pattern recommendations are for at least 1.4m of fabric but that includes cutting the bias strips. You can use commercial bias and that’s fine but needs to be turned to the inside to hide it and therefore your neckline and armholes will be smaller than initially intended. I used a similar method on my black muslin version. Here are some solutions to the bias binding issue
1. Make your own from small scraps.
This is a technique I’ve stolen from the dark-side of our sewing sisters – the quilters. Cut whatever you can from the corners and spares of leftover fabric on the 45 degree angle and square off the ends.

Place these at 90 degrees to each other and sew corner to corner, as the pin is placed.

Now you have a very long strip
Trim the excess corners off and press.
Now you have enough! You will have seam lines on your neckline and armholes but it’s better than having no binding at all.

2. Use stretch fabric.
Jersey stretches in all directions and so does not need to be cut at 45 degrees.
For my black muslin version I used a neutral cotton jersey cut on the cross grain (bit more stretch in this direction) to bind the neck and armholes.
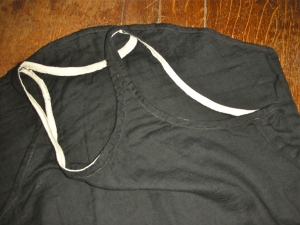
This was sewn on, then folded inside and sewed again. The cotton jersey does not fray and matches my skin tone so if it does show it won’t be very noticeable. If you have darker skin than me (and let’s face it, most people do) then chose a jersey that is similar to your own and keep a metre in your stash for just this purpose.
Using this method means the straps are smaller and narrower.
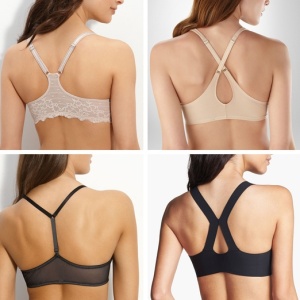
Now for the racer-back style. I’m not renowned for my athletic abilities and so I do not own a sports bra and my days of going braless are long gone. To wear this top with style (without a cardi) really needs the correct undergarments. Your options are:
1. Buy one.
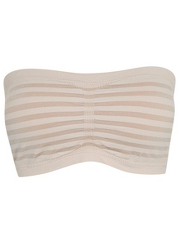
2. Use a bandeau bra. £4 Asda
3. Make your own.
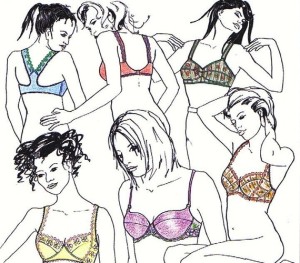
4. Adapt.
Buy a thingy that holds conventional straps in.
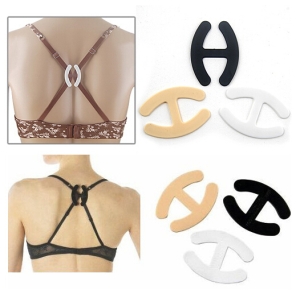
Or…………..Take an existing bra.
 Cut the back straps off and reposition as close to the clasp as possible.

Sew in place with zig-zag stitches. Ta Da! Racer back bra! Cheap and instant – what’s better than that?

OK, OK You’ve been very patient and have hopefully learnt some things along the way, so here’s the final result on a real live person….wearing her own adapted racer-back bra just to prove it works …….. All tops are worn with white linen trousers that I think are Vogue 7881, lined with white cotton and front patch pockets added.


 And now that two or three items have made, it’s a lot easier to start layering….
Including the Heron Wrap…..
 I’m sewing for summer: I’m dressing for summer: but summer is still not here!


July 30, 2015 at 9:46 am
All looking good!
August 1, 2015 at 7:09 am
Thanks Vicki.
July 30, 2015 at 9:56 am
Do you ever sleep??? Well done you! I really will have to get this book as I am so impressed with all your makes. I’ve just finished a sorbetto top and it’s nice but yours are so much more stylish. I’m a little surprised that you say you need loads more fabric for bias bindings though. A ten inch square will give you more than you need. Here’s a link, http://www.craftsy.com/blog/2014/02/continuous-bias-binding-tutorial/.
August 1, 2015 at 7:09 am
Brilliant tip on making bias Vivienne – thanks so much for this!
July 30, 2015 at 10:02 am
Really enjoyed reading your post with my morning cup of coffee. What fabulous tops you made! I’m inspired. You’ve showcased the M & M patterns so beautifully that I’ve had to put the book on my birthday list now. I might even blog them one day 😉
August 1, 2015 at 7:50 am
You won’t be sorry and I hope your birthday is soon.
July 30, 2015 at 10:11 am
Hi there Ruth,
So lovely to sit and read through your posting whilst having my morning coffee. Looks like you are having a fun time in the sewing room; I just wish you were enjoying wearing your lovely summer clothes in summer weather! If its any consolation, its raining here too!!
Have you ever tried the continuous bias tape method that is on Coletterie. I tried it when making my first Sorbetto top and it worked a treat. http://www.coletterie.com/tutorials-tips-tricks/continuous-bias-tape-tutorial. Works like magic and if you haven’t got a bias tape maker, there is a trick you can use of putting a pin or two on your ironing board, the width of the finished bias tape you want and pulling it through and pressing as you go along.
Thanks for showing is the items you have made from the workbook, I am starting to mull over buying this one. Have to admit when you first showed the book I wasn’t that keen. Seeing how great the items look when made up, you are converting me. Thanks again.
There is a rumour that we may get some sunshine at the weekend…………………..here’s hoping.
Can’t wait for the next show and tell.
August 1, 2015 at 7:52 am
Thanks Marysia – great tip!
July 30, 2015 at 10:40 am
You’ve been busy! Great tops. Sending sunny thoughts your way. Not that it’s sunny here. But we are still in the depths of winter.
August 1, 2015 at 7:53 am
Elle all this rain does produce lots of green fields but not a tan!
July 30, 2015 at 11:33 am
Lovely tops – and so.many of them! Clearly you are sewing instead of enjoying that soft Irish rain. Yet more reasons to get that book here.
August 1, 2015 at 7:54 am
Yes Kim I would recommend this book. It’s quite good value too – 6 patterns for £25.
July 30, 2015 at 12:14 pm
All nice tops and I sure learned a lot this morning!!!
August 1, 2015 at 7:54 am
That’s good Judi. Thank you
July 30, 2015 at 1:23 pm
This looks like a great pattern. You certainly have been very busy. Thanks for sharing your ideas.
August 1, 2015 at 7:55 am
My pleasure Jean. Have you checked out the links above for bias binding? Or maybe you already knew about this method…
July 30, 2015 at 1:27 pm
Terrific! I’m all for multiples of basics, particularly as they only get worn once before heading to the laundry. These look great. Love the matching to your Heron. I’m counting the days until my Workbook arrives…shipping from across the pond takes a while. I’m really enjoying your journey through the patterns. Clever lingerie solution, BTW…
August 1, 2015 at 7:55 am
Thanks Coco. I hope you enjoy making the clothes as much as I have.
July 30, 2015 at 1:57 pm
Goodness me Ruth, you are so amazingly productive – what a lot of tops and work. And thank you for such a nice, long, informative blog post. I was so excited to see them on you at the end!
Personally I am not keen on a bias edge – it always seems very laborious for a so-so finish, but your tips (and bra details) will be invaluable. I like the jersey versions best as they are softer around the bust. Which is your favourite?
July 30, 2015 at 2:41 pm
What finish would you use instead of the bias?
August 2, 2015 at 8:05 am
With this top I imagine it is the only option. With a very soft fabric you can sometimes turn it under. Also an unfinished edge might work with certain fabrics, or if it were cut on the bias. Also I might consider lining an item like this, but that would make it far more formal. Basically bias binding it is, I think!
August 1, 2015 at 7:57 am
Kate I’m just pleased to get the damned stuff on and get my edge stitching at the edge!
July 30, 2015 at 2:43 pm
Love the tops and also LOVE the pants. Did you make them? Are they bias cut? Fabric? Details please.
August 1, 2015 at 7:59 am
Barbara the trousers are Vogue 7881 made in white linen about 2 or 3 years ago – not bias just a lovely fabric.
July 30, 2015 at 5:56 pm
I have to say, Ruth, I love the way you throw yourself wholeheartedly into a project. There is no stopping you! First time I heard of M & M was a review of the factory dress and I have to say I hated the frumpiness of the style. Now, I find, after reading your last three posts a great temptation to order this book. Thanks for being so inspiring.
August 1, 2015 at 8:00 am
I’ve changed my mind about the style too Sheree. I wasn’t that taken with the shapelessness of some designs but I must admit to being converted now.
July 30, 2015 at 6:37 pm
I wasn’t that keen on the book and didn’t think the patterns were ‘ me’ but they are so you! I might have to reconsider.
August 1, 2015 at 8:02 am
Thanks Anne. I think you would suit these too.
July 30, 2015 at 10:53 pm
That’s an impressive amount of output, Ruth! I love that Heron wrap top!
August 1, 2015 at 8:03 am
Once I get going Shams I’m on a roll…… Must move on to the next pattern…..
July 31, 2015 at 3:09 am
Oh no! No summer for you? Well you certainly are ready for it. You’ve got a lot of lovely tops there. I’ve never seen the bra strap holder before. Hmm.
August 1, 2015 at 8:04 am
I hadn’t either Linda. Mind you a bit of string tied at the back will do the same job!
July 31, 2015 at 7:16 am
Lovely tops! I’ve been following your adventures with these styles and the garments are great! I do like how the straps are closer to the neckline – it makes for a much sportier look. I may have to try this out! I look forward to seeing what you make next!
August 1, 2015 at 8:05 am
Thanks Twotoast. I like the closer fitting straps.
July 31, 2015 at 4:03 pm
Good gracious, that’s a lot of pretty tops. Wardrobe basics for sure. And like Barbara, I’m curious about those pants, they are very nice!
August 1, 2015 at 8:05 am
Thanks Jen. Trousers are Vogue 7881.
August 1, 2015 at 6:22 am
Cute tops, love the bra trick…I use that on all my bridesmaids dresses…keeps the thin straps from rolling down their shoulders. You could almost make those tops reversible if they were doubled fabrics with the single binding…But…the big butt…darts girl…a couple of bust darts would make the ivory and white versions hang straighter…going back to my cave of ivory satin. You just look so glamorous in all the garments you make…wishing I was younger and taller like you!
August 1, 2015 at 8:07 am
That’s the reason I like this top so much – NO DARTS! and then you can’t find fault about where they end – LOL
August 2, 2015 at 4:45 am
You’re right, Ruth!!!! Again…
August 2, 2015 at 8:10 am
You’re really on a roll with these! They are all great, and I love the linen versions. Genius idea to hem before sewing the side seams. That’s one of those things that makes me say “why didn’t I think of that!”. And your trousers are gorgeous.
Pingback: M&M Work Wear | corecouture
Pingback: Culottes and Tops and etc | corecouture
April 28, 2016 at 12:07 pm
Great Tipps for sewing the bantam shirt… Thank you!!
July 27, 2017 at 10:29 am
Thank you, this is SUCH a helpful post! I got the M&M book a week ago and am already making my second salt marsh skirt, and my second bantam vest. You have answered all of my questions about the vest construction – I think the book is brilliant, i was just hoping for a way of using readymade bias binding. And I love your clever bra solutions!! Genius. Am off to chop up my underwear now.
Pingback: No Fabric…. 2 & 3 | corecouture